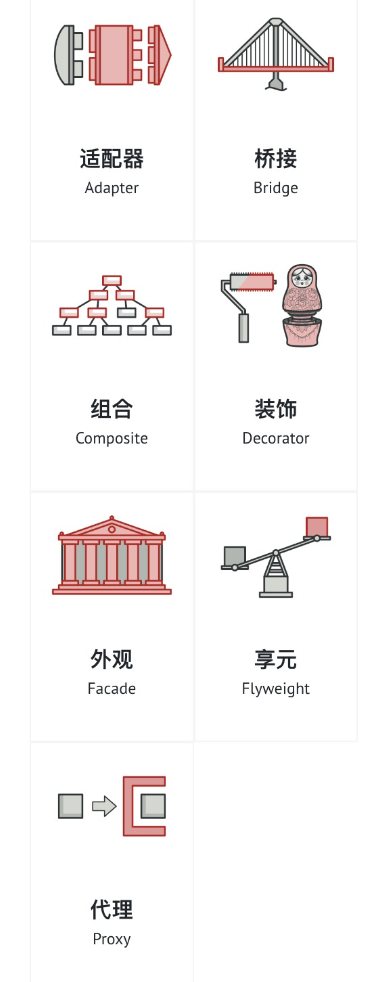
设计模式2(结构型模式)
结构型模式
这类模式介绍如何将对象和类组装成较大的结构,并同时保持结构的灵活和高效。
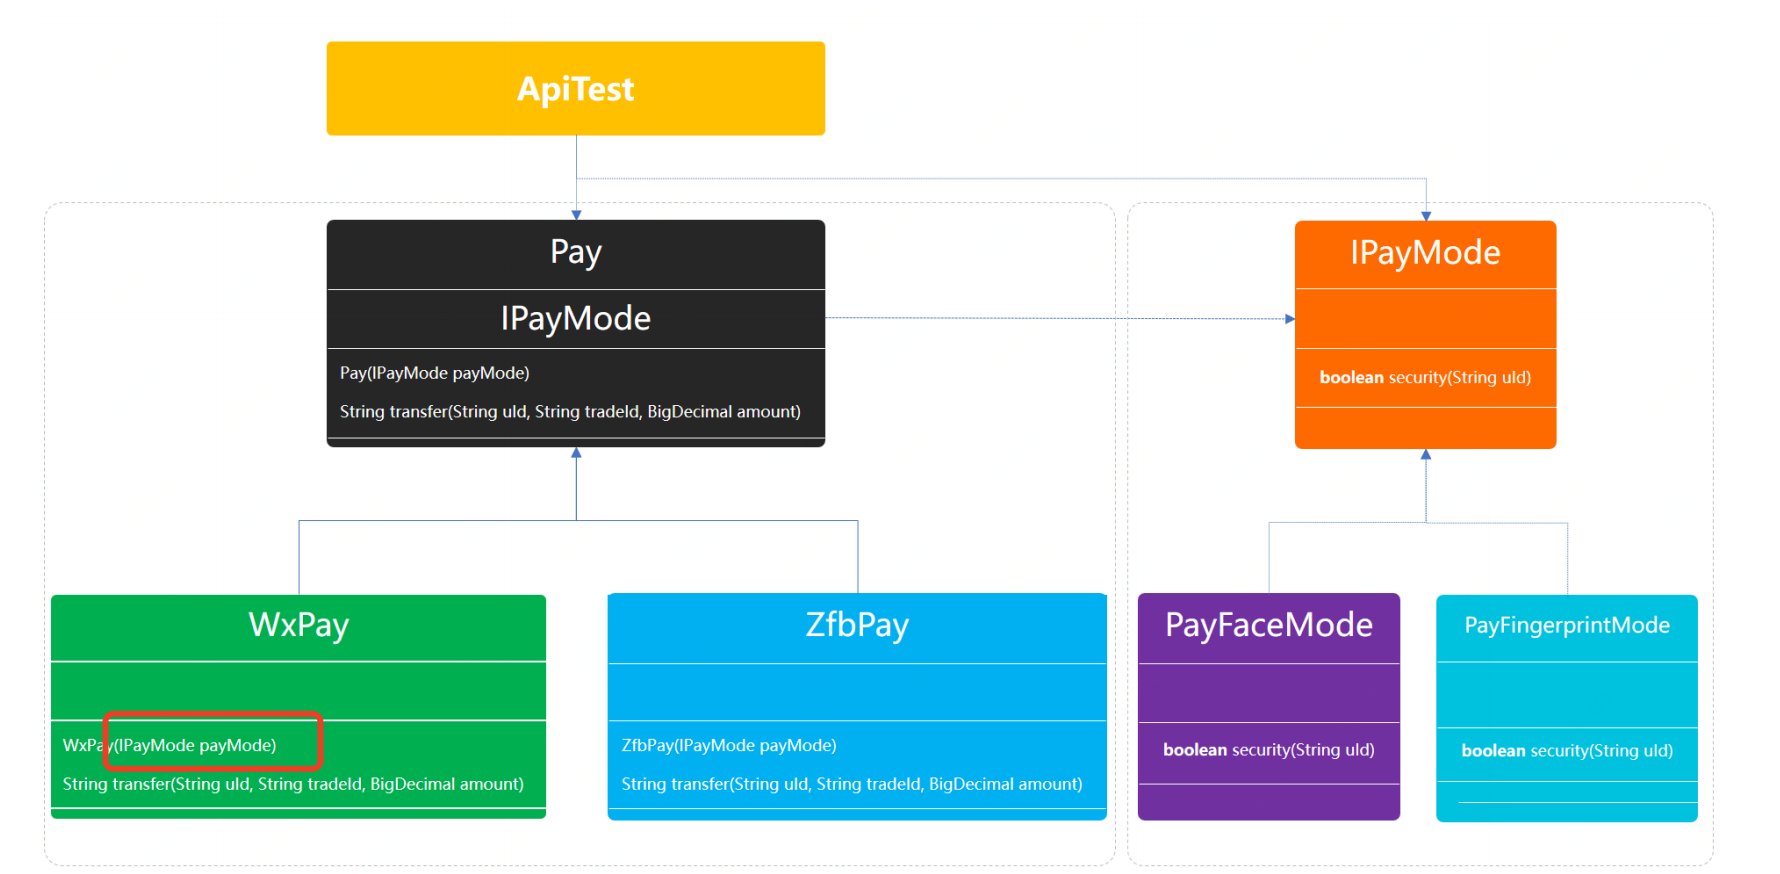
桥接模式
桥接模式的主要作用就是通过将抽象部分与实现部分分离,把多种可匹配的使用进行组合。说白了核心实现也就是在 A 类中含有 B 类接口,通过构造函数传递 B 类的实现,这个 B 类就是设计的桥。
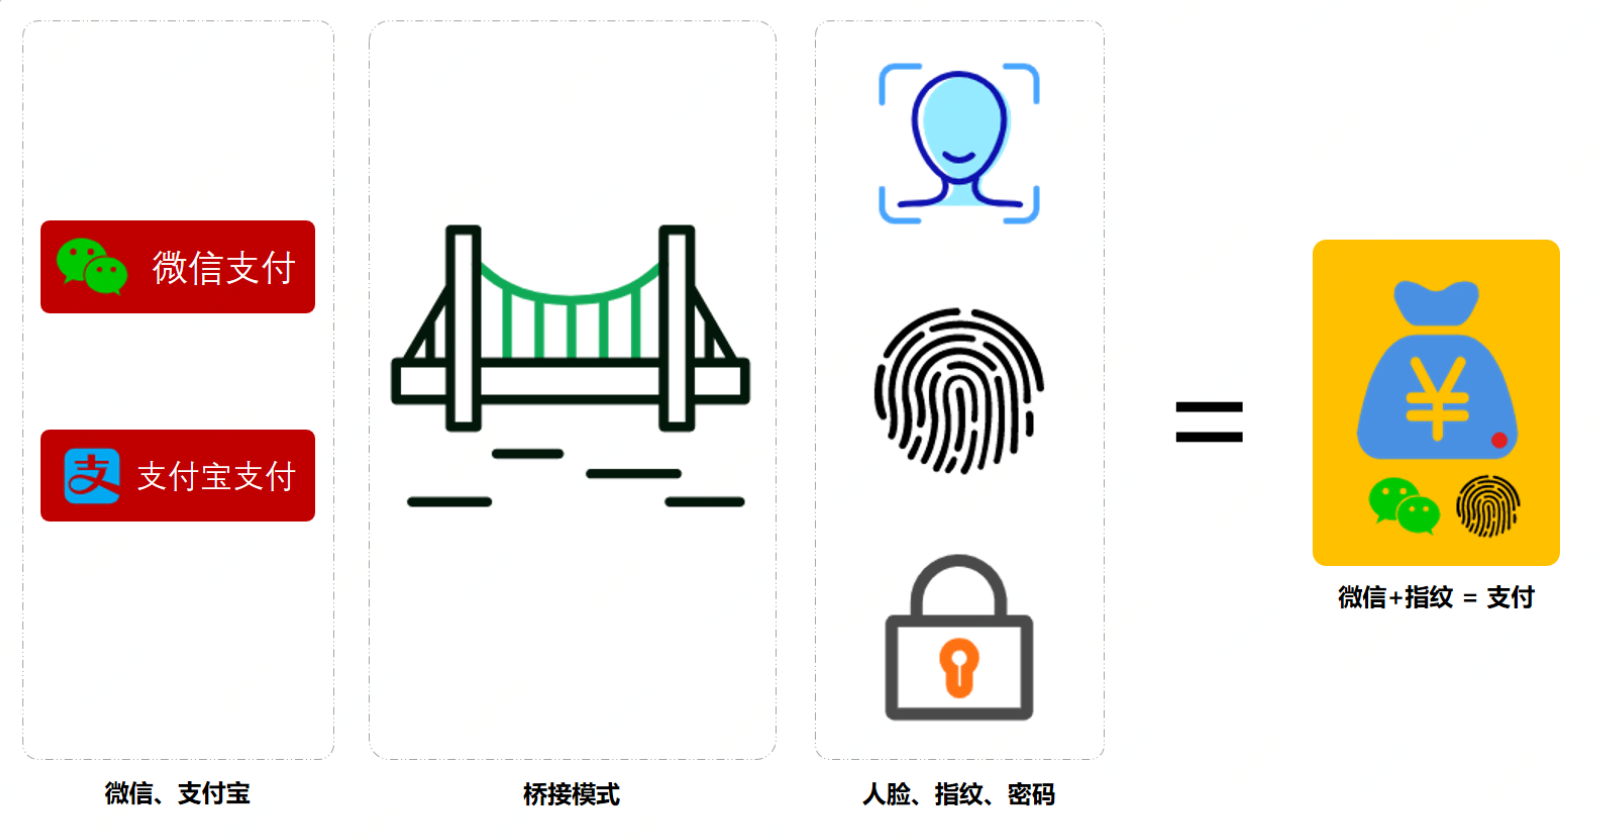
从上面的ifelse方式实现来看,这是两种不同类型的相互组合。那么就可以把支付方式和支付模式进行分离通过抽象类依赖实现类的方式进行桥接,通过这样的拆分后支付与模式其实是可以单独使用的,当需要组合时候只需要把模式传递给支付即可。
桥接模式的关键是选择的桥接点拆分,是否可以找到这样类似的相互组合,如果没有就不必要非得使用桥接模式。
1
2
3
4
5
6
7
8
9
10
11
12
| @Test
public void test_pay() {
System.out.println("\r\n模拟测试场景;微信支付、人脸方式。");
Pay wxPay = new WxPay(new PayFaceMode());
wxPay.transfer("weixin_1092033111", "100000109893", new BigDecimal(100));
System.out.println("\r\n模拟测试场景;支付宝支付、指纹方式。");
Pay zfbPay = new ZfbPay(new PayFingerprintMode());
zfbPay.transfer("jlu19dlxo111","100000109894",new BigDecimal(100));
}
|
外观模式(门面模式)
(context)
外观模式的主要目的在于 让外部减少与 子系统内部的多个模块的交互,从而让外部能够更简单得使用子系统。它负责把客户端的请求转发给子系统内部的各个模块进行处理。
简单点理解就是,通过创建一个统一的类,用来包装子系统中一个或多个复杂的类,客户端可以通过调用外观类的方法来调用内部子系统中所有方法。
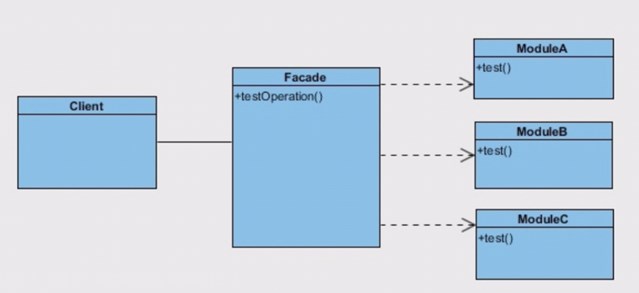
facade和module是合成关系
- 由于 Facade 类封装了各个模块交互的过程,如果今后内部模块调用关系发生了变化,只需要修改 Facade 实现就可以了。
- Facade实现是可以被多个客户端调用的
1
2
3
4
5
6
7
8
9
10
11
12
13
14
15
16
17
18
19
20
21
22
23
24
25
26
27
28
29
30
31
32
33
34
35
36
37
38
| public class ModuleA {
public void testFuncA() {
System.out.println("This is Function From 改变了");
}
}
public class ModuleB {
public void testFuncB() {
System.out.println("This is Function From ModuleB");
}
}
public class Facade {
private ModuleA moduleA = null;
private ModuleB moduleB = null;
private ModuleC moduleC = null;
private static Facade mFacade = null;
private Facade(){
moduleA = new ModuleA();
moduleB = new ModuleB();
moduleC = new ModuleC();
}
public static Facade getInstance() {
if(mFacade == null) {
mFacade = new Facade();
}
return mFacade;
}
public void testOperation() {
moduleA.testFuncA();
moduleB.testFuncB();
moduleC.testFuncC();
}
}
public class Client {
public static void main(String arg[]) {
Facade.getInstance().testOperation();
}
}
|
享元模式
(string)
享元的目的是为了减少不必要的内存消耗,将多个对象的访问集中起来,不必为每个访问者创建一个单独的对象,以此来降低内存的消耗。
1
2
3
4
5
6
7
8
9
10
11
12
13
14
15
16
17
18
19
20
21
22
23
24
25
26
27
28
29
30
31
32
33
34
35
36
37
38
39
40
41
42
43
44
45
| public class FlyWeight {
static class MyString {
private String myChar;
public MyString(String myChar) {
this.myChar = myChar;
}
public void display() {
System.out.println(myChar);
}
}
static class MyCharacterFactory {
private Map<String, MyString> pool;
public MyCharacterFatory() {
pool = new HashMap<>();
}
public MyString getMyCharacte(String strig) {
MyString myString = pool.get(strig);
if (myString == null) {
myString = new MyString(strig);
pool.put(strig, myString);
}
return myString;
}
}
public static void main(String[] args) {
MyCharacterFactory myCharacterFactory = new MyCharacterFactory();
MyString a = myCharacterFactory.getMyCharacte("a");
MyString b = myCharacterFactory.getMyCharacte("b");
MyString a1 = myCharacterFactory.getMyCharacte("a");
MyString d = myCharacterFactory.getMyCharacte("d");
if (a == a1) {
System.out.println("true");
}
}
}
|
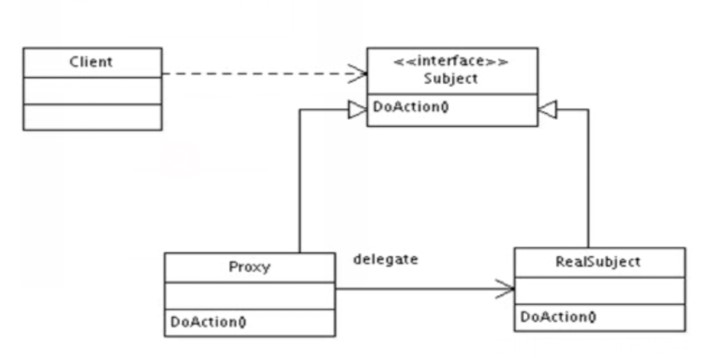
代理模式
通过代理对象访问目标对象.这样做的好处是:可以在目标对象实现的基础上,扩展目标对象的功能。或者交给另一个类去做事情。
代理对象拦截真正对象的方法调用,在真正的对象调用前/后实现自己的逻辑调用
这里使用到编程中的一个思想:不要随意去修改别人已经写好的代码或者方法,如果需改修改,可以通过代理的方式来扩展该方法。
动态代理的用途与装饰模式很相似,就是为了对某个对象进行增强,还有交给另一个去做事。所有使用装饰者模式的案例都可以使用动态代理来替换。
1
2
3
4
5
6
7
8
9
10
11
12
13
14
15
16
17
18
19
20
21
22
23
24
25
26
27
28
29
30
31
32
33
34
35
36
37
38
39
40
41
42
43
44
45
46
47
48
49
50
51
52
53
54
55
56
57
58
59
60
61
62
63
64
65
66
67
68
69
70
71
72
73
74
75
76
77
78
79
80
81
82
83
84
85
86
87
88
89
90
91
92
93
94
95
|
interface Subject {
void sellBook();
}
public class RealSubject implements Subject {
@Override
public void sellBook() {
System.out.println("出版社卖书");
}
}
public class ProxySubject implements Subject {
private RealSubject realSubject;
@Override
public void sellBook() {
if (realSubject == null) {
realSubject = new RealSubject();
}
sale();
realSubject.sellBook();
give();
}
public void sale() {
System.out.println("打折");
}
public void give() {
System.out.println("送优惠券");
}
}
public class Main {
public static void main(String[] args) {
ProxySubject proxySubject = new ProxySubject();
proxySubject.sellBook();
RealSubject realSubject = new RealSubject();
MyHandler myHandler = new MyHandler();
myHandler.setProxySubject(realSubject);
Subject subject = (Subject) Proxy.newProxyInstance(realSubject.getClass().getClassLoader(),
realSubject.getClass().getInterfaces(), myHandler);
subject.sellBook();
}
}
public class MyHandler implements InvocationHandler {
private RealSubject realSubject;
public void setProxySubject(RealSubject realSubject) {
this.realSubject = realSubject;
}
@Override
public Object invoke(Object proxy, Method method, Object[] args) throws Throwable {
sale();
proxy = method.invoke(realSubject, args);
give();
return proxy;
}
public void sale() {
System.out.println("打折");
}
public void give() {
System.out.println("送优惠券");
}
}
|
组合
将对象组合成树形结构,使得使用者可以用 一致的方式 处理单个对象和对象的组合。
客户程序可以向处理简单元素一样来处理复杂元素,从而使得客户程序与复杂元素的内部结构解耦。
![[Pasted image 20250902154220.png]]
文件系统
1
2
3
4
5
6
7
8
9
10
11
12
13
14
15
16
17
18
19
20
21
22
23
24
25
26
27
28
29
30
31
32
33
34
35
36
37
38
39
40
41
42
43
44
45
|
interface FileSystemComponent {
fun show()
}
class File(private val name: String) : FileSystemComponent {
override fun show() {
println("File: $name")
}
}
class Folder(private val name: String) : FileSystemComponent {
private val children = mutableListOf<FileSystemComponent>()
fun add(component: FileSystemComponent) {
children.add(component)
}
override fun show() {
println("Folder: $name")
for (child in children) {
child.show()
}
}
}
fun main() {
val root = Folder("root")
val docs = Folder("docs")
val img = Folder("images")
val file1 = File("resume.doc")
val file2 = File("cover.jpg")
docs.add(file1)
img.add(file2)
root.add(docs)
root.add(img)
root.show()
}
|
装饰模式
(Collections 工具类、I/O、context)
👉 在不修改原有类的情况下,动态地给对象添加功能。用“包装”的方式扩展对象的功能,比继承更灵活。
![[Pasted image 20250902154525.png]]
咖啡加料
1
2
3
4
5
6
7
8
9
10
11
12
13
14
15
16
17
18
19
20
21
22
23
24
25
26
27
28
29
30
31
32
33
34
35
36
37
38
39
40
41
42
|
interface Coffee {
fun cost(): Double
fun description(): String
}
class SimpleCoffee : Coffee {
override fun cost() = 5.0
override fun description() = "Simple Coffee"
}
open class CoffeeDecorator(private val coffee: Coffee) : Coffee {
override fun cost() = coffee.cost()
override fun description() = coffee.description()
}
class MilkDecorator(coffee: Coffee) : CoffeeDecorator(coffee) {
override fun cost() = super.cost() + 2.0
override fun description() = super.description() + ", Milk"
}
class SugarDecorator(coffee: Coffee) : CoffeeDecorator(coffee) {
override fun cost() = super.cost() + 1.0
override fun description() = super.description() + ", Sugar"
}
fun main() {
var coffee: Coffee = SimpleCoffee()
println("${coffee.description()} = ${coffee.cost()}")
coffee = MilkDecorator(coffee)
println("${coffee.description()} = ${coffee.cost()}")
coffee = SugarDecorator(coffee)
println("${coffee.description()} = ${coffee.cost()}")
}
|
Simple Coffee = 5.0
Simple Coffee, Milk = 7.0
Simple Coffee, Milk, Sugar = 8.0
- 组合模式:关注 整体与部分的层级结构(树形结构)。
- 装饰模式:关注 给对象动态地附加新功能(链式包装)。
适配器(adapter)模式
把一个类的接口变换成客户端所期待的另一种接口,从而使原本因接口不匹配而无法在一起使用的类能够一起工作。
适配器就是一种适配中间件,它存在于不匹配的二者之间,用于连接二者,将不匹配变得匹配,简单点理解就是平常所见的转接头,转换器之类的存在。
类适配器
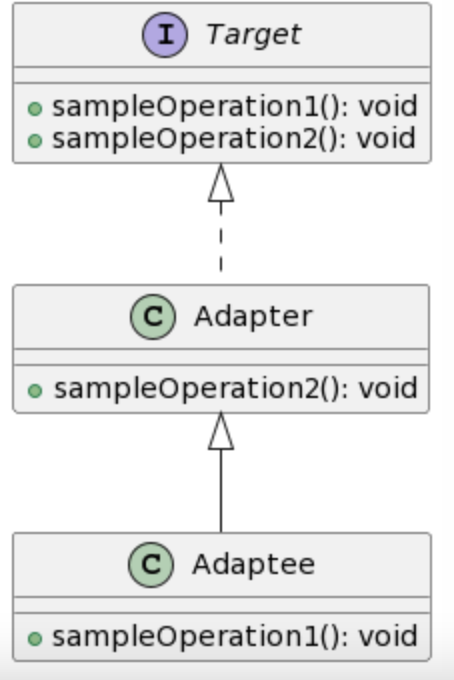
原理:通过继承来实现适配器功能。
类适配器使用对象继承的方式,是静态的定义方式
对于类适配器,适配器可以重定义Adaptee的部分行为,使Adaptee有了sampleOperation2()
对于类适配器,仅仅引入了一个对象,并不需要额外的引用来间接得 到 Adaptee
对于类适配器,由于适配器直接继承了Adaptee,使得适配器不能和 Adaptee的子类一起工作
1
2
3
4
5
6
7
8
9
10
11
12
13
14
15
16
17
18
19
20
21
22
23
24
25
26
27
28
| public interface Target {
void sampleOperation1();
void sampleOperation2();
}
public class Adaptee {
public void sampleOperation1() {
System.out.println("sampleOperation1");
}
}
public class Adapter extends Adaptee implements Target {
@Override
public void sampleOperation2() {
System.out.println("sampleOperation2");
}
}
public class MyClass {
public static void main(String[] args) {
Adapter adapter = new Adapter();
adapter.sampleOperation1();
adapter.sampleOperation2();
}
}
|
对象适配器
与类的适配器模式一样,对象的适配器模式把被适配的类的API转换成为目标类的API,与类的适配器模式不同的是,对象的适配器模式不是使用继承关系连接到Adaptee类,而是使用委派关系连接到Adaptee类。
对象适配器使用对象组合的方式,是动态组合的方式
对于对象适配器,一个适配器(adaptee)可以把多种不同的源适配到同一个目标
对于对象适配器,要重定义Adaptee的行为比较困难
对于对象适配器,需要额外的引用来间接得到Adaptee。

1
2
3
4
5
6
7
8
9
10
11
12
13
14
15
16
17
18
19
20
21
22
23
24
25
26
27
28
29
30
31
32
33
34
35
36
37
38
39
40
41
42
43
| public interface Target {
void sampleOperation1();
void sampleOperation2();
}
public class Adaptee {
public void sampleOperation1() {
System.out.println("sampleOperation1");
}
}
public class Adapter implements Target {
private Adaptee mAdaptee;
public Adapter(Adaptee adaptee) {
mAdaptee = adaptee;
}
@Override
public void sampleOperation1() {
mAdaptee.sampleOperation1();
}
@Override
public void sampleOperation2() {
System.out.println("sampleOperation2");
}
}
public class MyClass {
public static void main(String[] args) {
Adapter adapter =new Adapter(new Adaptee());
adapter.sampleOperation1();
adapter.sampleOperation2();
}
}
|
适配器模式不并是那种会让架构变得更合理的模式,更多的时候它只是充当救火队员的角色,帮助解决由于前期架构设计不合理导致的接口不匹配的问题。更好的做法是在设计的时候就尽量把以后可能出现的情况多考虑一些,例如这个例子,ServerFirst没有PlayerCount 方法,可以写一个适配器对象,实现PlayerCount 接口,新接口中调用旧接口的方法
Java设计模式透析之 —— 适配器(Adapter)_adpter注解 java-CSDN博客
委托模式(没有这种模式)
委托(Delegate)是 Kotlin 的一种语言特性,用于更加优雅地实现代理模式。
委托模式是软件设计模式中的一项基本技巧。在委托模式中,有两个对象参与处理同一个请求,接受请求的对象将请求委托给另一个对象来处理。委托模式是一项基本技巧,许多其他的模式,如状态模式、策略模式、访问者模式本质上是在更特殊的场合采用了委托模式。委托模式使得我们可以用聚合来替代继承,它还使我们可以模拟 mixin。
简单的 Java例子
在这个例子里,类模拟打印机Printer拥有针式打印机RealPrinter的实例,Printer拥有的方法print()将处理转交给RealPrinter的方法print()。
1
2
3
4
5
6
7
8
9
10
11
12
13
14
15
16
17
18
| class RealPrinter {
void print() {
System.out.print("something");
}
}
class Printer {
RealPrinter p = new RealPrinter();
void print() {
p.print();
}
}
public class Main {
public static void main(String[] args) {
Printer printer = new Printer();
printer.print();
}
}
|
复杂的 Java 例子
通过使用接口,委托可以做到类型安全并且更加灵活。在这个例子里,类别C可以委托类别A或类别B,类别C拥有方法使自己可以在类别A或类别B间选择。因为类别A或类别B必须实现接口I规定的方法,所以在这里委托是类型安全的。这个例子显示出委托的缺点是需要更多的代码。
1
2
3
4
5
6
7
8
9
10
11
12
13
14
15
16
17
18
19
20
21
22
23
24
25
26
27
28
29
30
31
| interface I {
void f();
void g();
}
class A implements I {
public void f() { System.out.println("A: doing f()"); }
public void g() { System.out.println("A: doing g()"); }
}
class B implements I {
public void f() { System.out.println("B: doing f()"); }
public void g() { System.out.println("B: doing g()"); }
}
class C implements I {
I i = new A();
public void f() { i.f(); }
public void g() { i.g(); }
public void toA() { i = new A(); }
public void toB() { i = new B(); }
}
public class Main {
public static void main(String[] args) {
C c = new C();
c.f();
c.g();
c.toB();
c.f();
c.g();
}
}
|